
Want to make a stress-free Bluey cake? You’ll be amazed to learn that a perfect Bluey birthday cake takes just 3 hours and 35 minutes to create and serves up to 24 people!
Your next birthday party or special celebration deserves this easy-to-make Bluey cake that any beginner can create. The cake stays fresh in the fridge for up to a week, or you can freeze it for up to a month. The recipe also works well with gluten and dairy-free ingredients to suit different dietary needs.
Our foolproof recipe will guide you through every step – from mixing delicate funfetti layers to creating beautiful buttercream decorations. Ready to create something special? Let’s begin!
Table of contents
Bluey Cake Recipe: Gather Your Tools and Ingredients
Let’s get ready to make an amazing Bluey cake! Success starts with the right tools and ingredients. This fun project combines simple baking with creative decorating that brings everyone’s favorite blue heeler to life.
Essential Tools for Your Bluey Cake Recipe
The right equipment makes all the difference in your cake’s success. You’ll need 7-inch or 8-inch round cake pans. Light-colored, anodized aluminum pans work best because they help your cake bake evenly and prevent the edges from getting too brown.
A digital kitchen scale will give you the most accurate measurements. Professional bakers rely on scales instead of cups because they lead to perfect cake texture every time. You should also keep measuring cups and spoons handy for smaller amounts.
Other essential tools include:
- Mixing bowls (glass or metal work well)
- Electric mixer (stand mixer or hand mixer)
- Offset spatula for frosting application
- Bench scraper for smoothing cake sides
- Serrated knife for leveling cake layers
- Cake board (8-10 inch) for stability
- Cooling racks for properly cooling your layers
Simple Ingredients for Funfetti and Buttercream in Your Bluey Cake
A cheerful funfetti interior matches Bluey’s playful spirit perfectly. Here’s what you need for the funfetti cake layers:
- 3 cups all-purpose flour
- 3 cups granulated sugar
- 2½ teaspoons baking powder
- 1 teaspoon salt
- 2 sticks unsalted butter (room temperature)
- 1 cup pasteurized egg whites (about 7 egg whites)
- 1½ cups buttermilk (room temperature)
- 2 tablespoons vegetable oil
- 2 teaspoons vanilla extract
- 1½ teaspoons almond extract (optional)
- ½ cup rainbow jimmies (long strand sprinkles)
Your vanilla buttercream frosting needs:
- 3 cups unsalted butter (room temperature)
- 1 tablespoon vanilla extract
- 1 teaspoon salt
- 10 cups powdered sugar
- ½ cup heavy cream
Sky blue, royal blue, black, and yellow gel food coloring will create Bluey’s distinctive look. Gel coloring works better than liquid because it won’t change your frosting’s texture.
Optional tools to make decorating easier
Some specialty tools can make your decorating much smoother. A cake turntable helps you frost evenly as you work, giving your cake a professional finish.
Piping bags and tips add those special details. Your Bluey cake will benefit from:
- 4 large round piping tips (like Wilton 1A)
- 2 medium round piping tips (Wilton 10)
- 3 small piping bags and 3 large piping bags
Rice krispie treats shape Bluey’s ears and snout beautifully. You’ll need 1 cup of marshmallows and 1½ cups of puffed rice cereal. Small bamboo skewers or toothpicks can support these 3D elements.
Pre-made black fondant creates Bluey’s facial features easily, though buttercream piping works just as well.
Note that these extra tools make decorating easier but aren’t required. Quality ingredients, simple baking equipment, and a fun attitude are all you really need to create something special!
Baking the Perfect Bluey Birthday Cake Layers

Let’s turn those ingredients into delicious cake layers. These layers will be the foundation of your Bluey cake. A few simple techniques will help you create perfectly even layers that are easy to work with.
How to Make a Funfetti Base for Your Bluey Cake Recipe
Rainbow sprinkles in funfetti cake match your Bluey cake design beautifully. The first step is to preheat your oven to 350°F (175°C). Get your cake pans ready by lining them with parchment rounds and greasing them with non-stick cooking spray. This step will help your cakes pop right out later.
Here’s how to make the cake batter:
- Mix your dry ingredients first
- Cream the butter and sugar together for 3-4 minutes until fluffy
- Add egg whites and mix until combined
- Gradually add buttermilk and extracts
- Fold in the rainbow sprinkles gently to avoid bleeding colors
Split your batter between the pans evenly. Use a digital scale to weigh each pan for perfect layers. Pour equal amounts and smooth the tops with your spatula. Bake for about 25-26 minutes. Your cake is ready when a toothpick comes out with just a few moist crumbs.
Tips for Even Baking and Cooling in Your Bluey Cake Process
Your Bluey cake needs flat layers to stack beautifully. Here are some tricks to avoid domed tops:
The oven temperature makes a big difference. Dropping it to 325°F prevents domes that form when cake rises too quickly. This means your baking time increases by about 50%. Cake strips around your pans help a lot too. These fabric strips need a good soak in water. They protect the pan’s edges and help the cake bake evenly.
The cooling process matters just as much. Let the pans rest on a wire rack for 10 minutes. Take your offset spatula and run it around the edge to free the cake. You can speed up cooling by putting the pans in the freezer for 45 minutes. Warm layers will crumble and collapse if you try to remove or frost them too soon.
Ready to remove the cakes? Put a cooling rack upside down on the pan. Grab your oven mitts and flip everything over in one smooth motion. The parchment paper should peel off easily. Let the cakes cool completely.
Freezing layers for easier handling
Frozen layers are a secret weapon for your Bluey cake. They’re much easier to work with and won’t crumble during decorating.
Once your layers cool completely, wrap each one in two layers of plastic wrap if you plan to freeze them for a few days. Long-term storage needs an extra layer of foil or a ziplock bag. Properly wrapped layers stay fresh in the freezer for 2-3 months.
Take the layers out about 30 minutes before decorating. Keep them wrapped while they thaw. This prevents condensation from forming on the cake. Slightly chilled layers are much easier to trim, level, and frost.
Professional bakers love this technique. Chilled layers reduce crumbing and help buttercream set quickly. This keeps your layers from sliding around during assembly. Breaking up the process this way makes creating your Bluey cake much more manageable and fun.
Bluey Cake Recipe: Make and Color the Buttercream
Making the perfect buttercream is significant to your Bluey cake’s success. Let the cake layers cool while you prepare a smooth, pipeable frosting that matches Bluey’s signature colors.
Simple Buttercream Recipe for Beginners Making a Bluey Cake
American buttercream forms the foundations of your Bluey cake decorations. This version needs just four ingredients, making it easier than other complex frostings:
- Beat 3 cups of room temperature unsalted butter until smooth and creamy
- Gradually mix in 10 cups of sifted powdered sugar
- Add 1 tablespoon of vanilla extract and 1 teaspoon of salt
- Incorporate ½ cup of heavy cream until you reach the desired consistency
The secret to silky buttercream lies in your technique. Your butter should be soft enough to indent when pressed but not appear greasy. Beat the butter alone for 3-4 minutes until fluffy before adding other ingredients. This original whipping creates the base for a velvety texture.
How to Get Bluey’s Colors Right in Your Cake Frosting
You need careful color mixing with gel food coloring to capture Bluey’s exact shades. Gel is essential because liquid food coloring thins your frosting.
Your authentic Bluey cake needs these specific colors:
- Light blue (for Bluey’s belly, paws, and eyebrows): Add a tiny drop of blue gel coloring to white buttercream
- Medium blue (for Bluey’s main body): Use sky blue gel coloring from brands like Chefmaster or Americolor
- Navy blue (for ears and facial details): Mix blue with a tiny bit of black gel coloring
- Tan (for snout and inner ears): Combine yellow and brown gel coloring
- Black (for eyes and nose): Use black gel coloring
Divide your buttercream and start with the lightest colors. You can color all frosting in one bowl by beginning with the lightest shade first.
Storing and adjusting frosting consistency
Your decorating success depends on the right buttercream consistency. Medium consistency works best for a crumb coat. In spite of that, if your frosting seems too stiff, add heavy cream 1 teaspoon at a time.
If your buttercream feels too soft, add powdered sugar 2-3 tablespoons at a time or chill it for 15-20 minutes.
You can store unused buttercream in airtight containers in the refrigerator for up to a week or freeze it for up to three months. Let refrigerated buttercream reach room temperature and rewhip it for 1-2 minutes to restore its fluffy texture.
Air bubbles in your frosting can be removed by stirring the buttercream with a wooden spoon and pressing it against the bowl’s sides. This technique preserves the frosting’s structure and creates a smooth Bluey cake.
Assemble and Shape Your Bluey-Themed Cake
The magic happens when you transform simple cake layers into a recognizable Bluey character during assembly. This significant stage brings your Bluey cake to life through proper stacking, shaping, and strategic chilling.
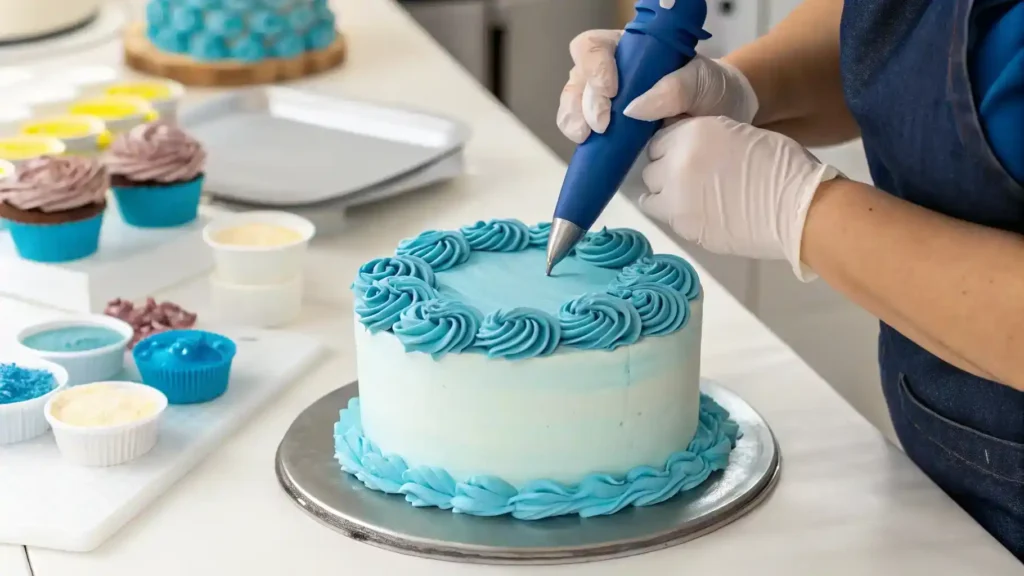
Stacking and Crumb Coating Your Bluey Cake Layers
Let your cake layers cool completely before assembly. This prevents any disasters. Put a small dollop of buttercream on your cake board. This creates a stable foundation and stops your first layer from sliding. Stack more layers with generous frosting between each one. Place the final layer upside down to get a perfectly flat top.
Now comes the crumb coat – a thin layer of frosting over the whole cake. This original coating seals loose crumbs and keeps them from showing in your final decoration. Don’t worry about seeing crumbs in this layer. That’s why we call it a crumb coat! Your offset spatula and bench scraper will help create a smooth, even surface.
Using Rice Krispie Treats to Shape Bluey’s Features
Rice krispie treats are a great way to make Bluey’s signature ears and snout light and moldable. Heat marshmallows in a microwave-safe bowl for 30 seconds and stir. Keep heating in 15-second bursts until they melt completely. Mix in rice krispies cereal until everything gets coated.
Here’s how to shape Bluey’s features:
- Use cooking spray on your hands to prevent sticking
- Make two triangles for ears (about 3 inches tall and 2.5 inches wide)
- Shape a small oval for the snout (about 2 inches long and 3/4 inch thick)
- Press the shapes firmly to compact them
Stick toothpicks or small bamboo skewers into these shapes’ base to secure them to your cake. Check their proportions against your crumb-coated cake before final placement.
Chilling the cake before final decoration
Your assembled cake needs proper chilling. After the crumb coat, put the cake in the fridge for 30 minutes or freezer for 10 minutes. The buttercream should feel firm when touched. This vital step stops those annoying icing ridges and buttercream bulges during decoration.
On top of that, a well-chilled cake gives you the perfect surface to attach rice krispie ears and snout. These elements stick better when pressed against the cake while slightly warm. Quick chilling breaks between decorating steps keep everything stable and precise. You’ll be ready to create your masterpiece.
Decorating Tips for a Show-Stopping Bluey Cake
Let’s add the final creative touches to your Bluey cake! Now that your layered cake is chilled and shaped, you can bring this beloved cartoon character to life with detailed decorating techniques.
Piping Techniques for Bluey’s Face and Body Design
Start by using a toothpick or scribe to outline Bluey’s eyes, snout, and fur patches. This template will guide your decorating work. Here’s the sequence to follow:
- Pipe medium blue buttercream around the bottom half of the cake and add a thick stripe between the eyes
- Cover the upper half with navy blue buttercream, using a tapered offset spatula and small piece of acetate sheet to smooth
- Press the rice krispie ears into place and coat their front with tan buttercream
- Pipe navy blue buttercream around the sides and back of the ears
- Add three navy blue spots on Bluey’s back and create the tail using both medium and navy blue frosting
Adding Final Details Like Eyes and Paws to Your Bluey Cake
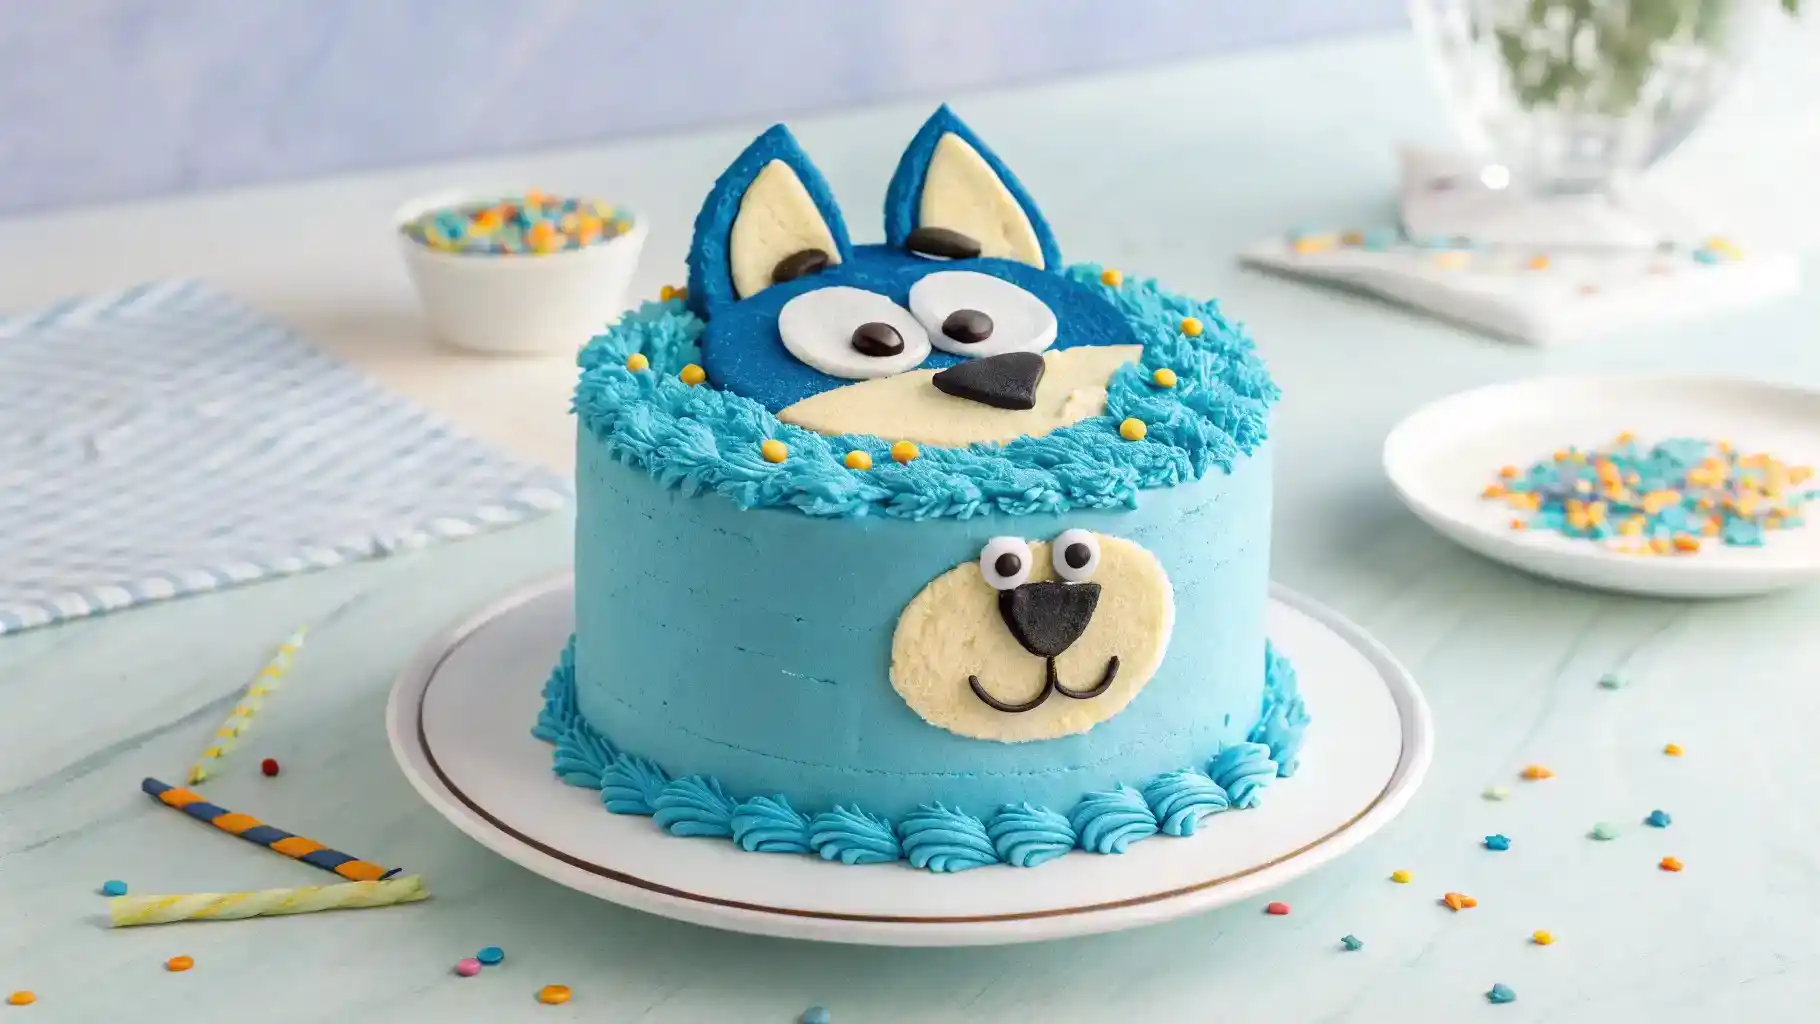
Your Bluey cake comes alive with these special details. Start with a light blue shallow semi-circle at the cake’s base for Bluey’s tummy. White buttercream creates the eyes – smooth them carefully with an offset spatula. Black buttercream pupils complete the eyes perfectly.
The rice krispie snout needs gentle pressing into position before covering it with tan buttercream. A toothpick helps trace the nose shape, and a black triangle piped at the snout’s top adds definition. A small smile carved beneath the nose captures that authentic Bluey expression.
Medium blue frosting works best for Bluey’s arms and legs, while light blue frosting creates the paws and eyebrows. Small lines carved into the paws with a toothpick give them realistic toes that make your Bluey birthday cake stand out.
Common mistakes to avoid while decorating
Creating a DIY Bluey cake can be tricky, even for experienced bakers. Room temperature buttercream works best – warm frosting becomes soupy and loses its shape. You might need to chill it if it starts getting too soft.
The crumb coat is a vital step you shouldn’t skip. Without it, loose crumbs mix into your final layer and create a messy look. Quick decorating between chilling steps often results in sliding decorations and bulging layers.
Your frosting texture should stay consistent throughout. Decorations droop if it’s too soft, while stiff frosting makes spreading impossible. Small amounts of powdered sugar stiffen the mixture, while heavy cream loosens it until you achieve the perfect consistency for your simple Bluey cake.
Conclusion
Making a Bluey cake at home might look daunting at first. You can craft this adorable character cake with the right tools, ingredients, and techniques.
Patience will make a huge difference in your baking journey. Of course, you should allow enough time between steps, especially when you have chilling phases. This approach will give your cake proper shape and keep decorations in place.
Your cake doesn’t need to be perfect. Every Bluey cake has its own special charm, and tiny flaws add personality to your creation. The process needs careful attention, but your little one’s smile will make all your efforts worth it.
Master these simple techniques first. A practice run of decorating steps can help boost your confidence as you transform this beloved character into a delicious cake. Your Bluey cake adventure is ready to begin!
For more fun and creative cake ideas, check out this Perfect Lemon Strawberry Cake Recipe
If you’re looking for refreshing drink pairings, try this Chick-fil-A Lemonade Recipe to complement your cake at parties
FAQs
Q1. How long does it take to make a Bluey cake? A perfect Bluey cake can be created in about 3 hours and 35 minutes. This includes time for baking, cooling, and decorating. The cake can serve up to 24 people, making it ideal for birthday parties or special celebrations.
Q2. Can I make the Bluey cake in advance? Yes, you can make the Bluey cake up to a week in advance and store it in the refrigerator. For longer storage, you can freeze the cake for up to a month. This allows for better time management when planning for an event.
Q3. What are the essential tools needed for making a Bluey cake? Key tools include 7-inch or 8-inch round cake pans, a digital kitchen scale, mixing bowls, an electric mixer, an offset spatula, a bench scraper, a serrated knife, and a cake board. Optional tools like a cake turntable and piping bags can make decorating easier.
Q4. How do I get the right colors for Bluey’s fur? Use gel food coloring to achieve Bluey’s colors without affecting frosting consistency. You’ll need sky blue for the main body, a lighter blue for the belly and paws, and navy blue for ears and facial details. Mix colors carefully, starting with the lightest shades and progressing to darker ones.
Q5. What’s the secret to a smooth, professional-looking Bluey cake? The key is proper chilling between steps. After applying the crumb coat, refrigerate the cake for 30 minutes or freeze for 10 minutes until the buttercream is firm. This prevents icing ridges and buttercream bulging during decoration. Also, work with slightly chilled layers when assembling and decorating for easier handling and a cleaner finish.

Bluey Cake
Equipment
- Cake Pans
- Digital Kitchen Scale
- Mixing Bowls
- Electric Mixer
- Offset Spatula
- Bench Scraper
- Serrated Knife
- Cake Board
- Cooling rack
Ingredients
Funfetti Cake Layers
- 3 cups all-purpose flour
- 3 cups granulated sugar
- 2.5 tsp baking powder
- 1 tsp salt
- 2 sticks unsalted butter room temperature
- 1 cup pasteurized egg whites about 7 egg whites
- 1.5 cups buttermilk room temperature
- 2 tbsp vegetable oil
- 2 tsp vanilla extract
- 1.5 tsp almond extract optional
- 0.5 cup rainbow jimmies long strand sprinkles
Buttercream Frosting
- 3 cups unsalted butter room temperature
- 1 tbsp vanilla extract
- 1 tsp salt
- 10 cups powdered sugar
- 0.5 cup heavy cream
Instructions
- Preheat your oven to 350°F (175°C). Grease and line your cake pans with parchment paper.
- In a mixing bowl, combine the dry ingredients: flour, sugar, baking powder, and salt.
- Cream the butter and sugar together for 3-4 minutes until fluffy. Add egg whites and mix well.
- Gradually add buttermilk and extracts, then fold in the rainbow sprinkles. Split the batter evenly between pans.
- Bake for 25-26 minutes, or until a toothpick comes out clean. Cool layers on a wire rack.
- Prepare buttercream by beating butter until smooth, then adding powdered sugar, vanilla, salt, and heavy cream. Adjust consistency as needed.
- Assemble the cake by stacking layers with buttercream between them. Apply a crumb coat and chill the cake for 30 minutes before final decoration.
- Use rice krispie treats to create Bluey’s ears and snout. Decorate with buttercream to match Bluey’s features.